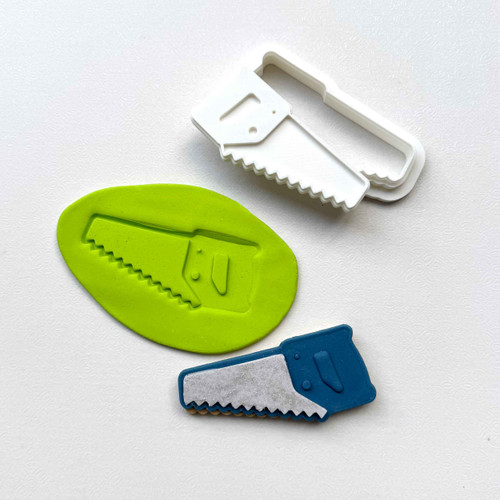
Wood Saw Cookie Stamp and Cutter Set
Whether you're baking for a handyman, a builder, or just love tool-themed treats, this Wood Saw Cookie Stamp will cut through the ordinary. Featuring a sharp zigzag blade and a handle detail, this stamp adds a quirky, DIY twist to any cookie platter – perfect for Father’s Day, tool parties, or tradie gift boxes.
Sharp lines and clean cuts – every time
With embossed details that stand out beautifully on fondant, this cookie stamp is easy to use and gives pro-looking results even for beginners. Stamp – embossed (raised details on the cookie surface). Made in-house and available as a full set or individually (stamp or cutter), it’s a solid addition to your baking toolbox.
Perfect for tool-themed cakes, parties and gifts
Ideal for Father’s Day, DIY birthdays, construction parties or even “thanks, Dad!” cookie boxes, this saw design is fun, practical, and guaranteed to raise a smile. Use it as part of a full tool set with our hammer or wrench designs, or feature it solo for a bold statement.
Durable, reusable, and made with care
This cutter and stamp are made to last – strong, reliable and ready to help you bake again and again. As a handmade product, our turnaround times can vary, especially around peak seasons – order early to avoid disappointment.
What size cookie does it create?
Measurements – 85mm x 40mm
Stamp – embossed (raised details on the cookie surface)
Explore More from Our Range:
Construction and Building Party Ideas
Construction and Building Cookie Cutters & Stamps
FAQs
Can I pair this with other tools?
Yes – we have other tool-themed stamps like hammers, screwdrivers and tool belts that go brilliantly together for DIY or builder parties.
Is it easy to line up the cutter?
Absolutely. The cutter is designed to follow the shape of the stamp for clean edges and no guesswork.
What decorating styles work best?
This design is perfect for two-tone fondant or edible paint – highlight the blade or handle for extra effect.
Is this suitable for Father’s Day cookies?
Definitely – it’s one of our top picks for dads, grandads, and any fix-it legends in your life.
Cookie Decorating Made Simple
1. Prepare Your Fondant
- Knead your fondant until smooth and pliable. PRO TIP – microwave it for 5–10 seconds at a time until soft.
- Dust your bench with cornflour and roll out to 2.5–3mm thickness.
2. Transfer Your Design
- Lightly dust the stamp with cornflour to prevent sticking. PRO TIP – use a paintbrush for finer details.
- Press the stamp firmly into fondant with even pressure. PRO TIP – use a rolling pin for best results.
- Lift the stamp carefully to reveal your design.
3. Add to Your Cookie
- Use the matching cutter to trim the fondant.
- Attach to your cookie. PRO TIP – mix equal parts sugar and boiling water to make sugar syrup glue.
Care Instructions
- Handwash only: Wash gently with warm, soapy water before and after use.
- No soaking: Avoid prolonged exposure to water.
- Dry completely: Air dry before storing.
- Heat sensitive: Not dishwasher safe. May warp in hot water or high heat.
- Use a soft-bristle brush (like a toothbrush) for intricate cleaning.
Always ensure your cutters and stamps are clean and dry before using.


