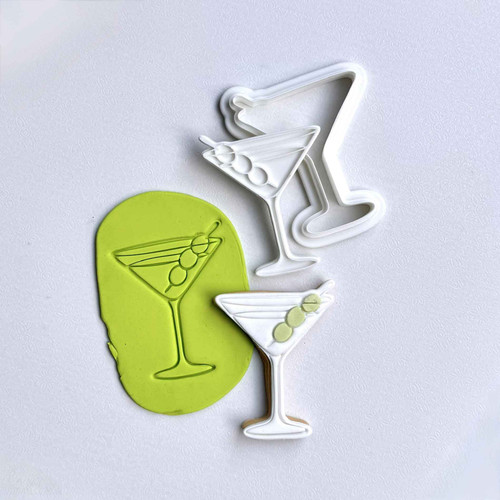
Martini Cookie Stamp and Cutter Set
Raise a glass to fabulous cookies with this Martini Cookie Stamp – the ultimate party starter for cocktail-themed bakes. Whether you're prepping for a hens night, an elegant dinner party or a fun 21st, this design brings all the charm of a classic martini (olives included!) to your dessert table.
Why this martini design stands out
The clean-lined silhouette of a martini glass is paired with three skewered olives and fine detailing, all brought to life with a debossed finish that presses neatly into your fondant.
Stamp – debossed (indented details on the cookie surface)
Choose from stamp only, cutter only, or full matching set for precision and ease. Each part is 3D printed in-house for durable, detailed results time after time.
Perfect for cocktail lovers and event favours
This stylish design is a hit at hens parties, birthday celebrations, themed bridal showers and adult gift boxes. Add it to a platter with our champagne or wine glass stamps for a full cocktail hour in cookie form!
Reusable and made with care
We make each set to order with longevity in mind – just wash, dry, and store flat. This design is a favourite for custom orders and event bakers, so we recommend ordering early to ensure availability for your upcoming celebration.
What size cookie does it make?
Measurements – approx. 80mm tall x 62mm wide
Stamp – debossed (indented details on the cookie surface)
Explore More from Our Range:
Food & Drink cookie stamps and cutters
Fantasy Cookie Cutters and Stamps
Summer & Beach themed party ideas
FAQs
Is the martini glass shape recognisable?
Yes – the stamp includes the classic V-shape glass, a thin stem, and a skewer of olives for extra detail.
Can I use this for a hens party?
Absolutely! It’s a go-to design for hens, 21sts, and cocktail night cookies.
Will the olive skewer show clearly?
Yes – the debossed finish gives clear separation so each element is easy to decorate or leave minimalist.
Does the cutter match the outline exactly?
Yes – the cutter is shaped to follow the outer edge of the glass and base for a crisp, clean finish.
Cookie Decorating Made Simple
1. Prepare Your Fondant
- Knead your fondant until smooth and pliable. PRO TIP – microwave it for 5–10 seconds at a time until soft.
- Dust your bench with cornflour and roll out to 2.5–3mm thickness.
2. Transfer Your Design
- Lightly dust the stamp with cornflour to prevent sticking. PRO TIP – use a paintbrush for finer details.
- Press the stamp firmly into fondant with even pressure. PRO TIP – use a rolling pin for best results.
- Lift the stamp carefully to reveal your design.
3. Add to Your Cookie
- Use the matching cutter to trim the fondant.
- Attach to your cookie. PRO TIP – mix equal parts sugar and boiling water to make sugar syrup glue.
Care Instructions
- Handwash only: Wash gently with warm, soapy water before and after use.
- No soaking: Avoid prolonged exposure to water.
- Dry completely: Air dry before storing.
- Heat sensitive: Not dishwasher safe. May warp in hot water or high heat.
- Use a soft-bristle brush (like a toothbrush) for intricate cleaning.
Always ensure your cutters and stamps are clean and dry before using.


